
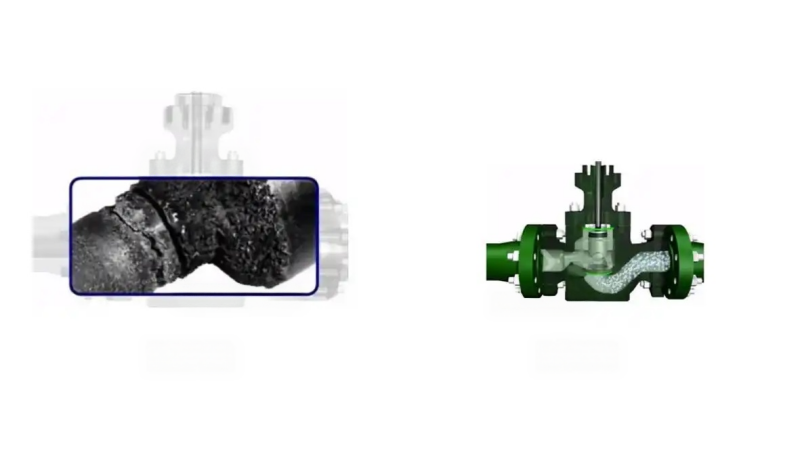
Cavitation and flashing are among the most common ways a control valve gets destroyed. Both happen when a liquid is throttled below its vapor pressure, and both erode the trim and body so fast that a valve can fail within months. Knowing what causes them, how they differ and how to prevent them is basic survival knowledge for high-pressure-drop service.
What Are Flashing and Cavitation?
When a liquid passes through the restricted area of a valve, velocity rises and pressure falls sharply. If the pressure drops below the vapor pressure of the liquid, vapor bubbles form in the flow. From there the liquid takes one of two paths. In flashing, the downstream pressure stays below the vapor pressure, so the bubbles survive and the flow stays two-phase. In cavitation, the pressure recovers above the vapor pressure before the outlet, so the bubbles collapse violently as they hit the higher-pressure zone. Which one happens depends on where the downstream pressure sits relative to the vapor pressure.
How Cavitation Damages the Valve
Collapsing bubbles release intense shock waves and micro-jets that strike the metal around them. Repeated collapse produces the classic honeycomb or pitting damage on the plug, the seat and the downstream body wall. Cavitation also makes the valve sound like gravel flowing through the pipe, shakes the valve and the line, and, once the trim is eaten away, drives up leakage and ruins the control.
How Flashing Damages the Valve
Flashing is different. There are no collapsing bubbles; instead, high-velocity droplets and vapor impinge on the downstream body and piping and machine material away in smooth grooves, typically just downstream of the seat. The erosion follows the flow path, and without protection it continues into the downstream pipe.
How to Prevent Cavitation and Flashing
The defenses are the same for both, in order of preference. Stage the pressure drop with multi-stage trim, such as an anti-cavitation cage or several pressure-reducing stages, so the pressure never falls far below the vapor pressure at any point; drilled and slotted anti-cavitation cages are the standard tool. Pick a valve type that suits the service: angle valves with hardened, erosion-resistant trim are preferred where flashing or severe cavitation is expected, because the flow exits without impinging on the plug. Use hard trim materials, stellite facings, tungsten carbide coatings or hardened body liners, where erosion cannot be avoided. And protect the downstream piping where flashing is unavoidable, with erosion allowance or replaceable wear liners.
Detecting Cavitation in Operation
In operation, cavitation shows up as harsh, gravel-like noise, vibration of the valve and pipe, and rising leakage or unstable control as the trim erodes. Include the trim and the downstream body in the periodic inspection. If cavitation damage shows up, move to a multi-stage anti-cavitation trim or a different valve type rather than simply replacing the valve.
Flashing vs Cavitation Summary
| Aspect | Flashing | Cavitation |
|---|---|---|
| Pressure recovery | Downstream pressure stays below vapor pressure | Pressure recovers above vapor pressure |
| Bubble behavior | Bubbles survive downstream | Bubbles collapse inside the valve |
| Typical damage | Wire-drawing erosion downstream of the seat | Honeycomb/pitting on plug, seat and body |
| Noise and vibration | Moderate | Severe (gravel-like noise, vibration) |
| Main prevention | Erosion-resistant trim, downstream protection | Multi-stage trim, hardened materials, angle valve |
Conclusion
Flashing and cavitation are pressure-recovery phenomena that can destroy control valve trim quickly if ignored. The practical defenses are the same for both: stage the pressure drop, choose an angle valve with hardened trim for severe service, and protect the downstream piping. When in doubt about a specific duty, give the service conditions to the manufacturer and let them recommend the trim and materials.
 No products in the cart.